Why Do My Pictures Upload Blurry on Instagram
Instagram is a fun social media platform, defended to the sharing of photos, and upward until recently, it started to allow videos and stories.
Some people have noticed that when they post on Instagram, the photo quality isn't as skillful as the original photo y'all took. Especially with the emergence of the x to 12-megapixel cameras, on the Samsung Galaxy S10 and the iPhone X, photo quality should exist upward by a huge margin.
The photos or videos you lot upload may look burry once they're posted and they don't retain the original high quality. There are a few ways to upload high-quality photos to Instagram without quality diminishing.
Why Does Instagram Make My Moving picture Blurry?
The reason your photos are blurry and lose quality afterward posting is either the aspect ratio is incorrect and then Instagram will compress your image. Or your file is over 1MB which means that your paradigm will exist compressed. To avert Instagram ruining the quality of your photos, y'all demand to have the correct aspect ratio or you no to be uploading a picture that'due south below 1MB.
All photos are constrained within 1080 pixels (px) so this results in pinch specially when your original photo size is 4000 x 3000px. Instagram makes your photos blurry for the best user experience in photograph loading, optimizing network connectivity, and taking upward minimal space in the phone's memory and bulldoze.
If Instagram didn't pixelate or make your photos low quality, your Instagram pictures and feed would look amazing, nonetheless, the user feel would be horrible. Yous'll have a very irksome, bloated app that you would start to hate so to forbid this, your images need to lose quality in order to requite people the all-time user feel.
There's no style to change the upload quality of your photos on Instagram, it all depends on the quality of your camera. If your Instagram posts are blurry, this is because of Instagram'south compression characteristic. All stories uploaded to Instagram too experience compression and loss in quality and then the best manner to set up this is to upload loftier-quality stories so you don't find the pinch as much.
one. Your Picture isn't Optimized
A blurry flick is the effect of poor optimization, a side result of Instagram most probable stretching the original image you uploaded. If you upload an image that'south besides pocket-size, or low resolution, Instagram will then stretch the image to fit your profile window.
To ready this trouble, upload an image that'due south of higher quality. You should certainly aim for Instagram's limit of thirty MB for an image. The reason being is that a higher quality prototype doesn't endure from stretching, and shrinking a college resolution photo isn't going to crusade blurry pixelation.
2. Poor Net Connection
If you take a poor cyberspace connection, either you're on mobile data or a slightly tiresome WiFi network, your posts may announced blurry. If y'all practise have a poor internet connection, then Instagram will lower the quality of pictures if the Internet speed is slow while uploading.
If this has happened to you, yous'll notice that your pictures seem normal to you while uploading, but once the upload is done, the quality goes downwards. Information technology's always important to remember to upload on a strong WIFI connectedness rather than information. Before yous do so, make certain to check your internet speed, and if information technology'south not good enough, either chance to data or wait for the pictures to stop being low quality.
3. Your Network Connection Timed Out
Not an uncommon problem, per say, but certainly a unique issue. You see, when you upload an prototype, it doesn't upload all of the data at 1 time–information technology does so a little at a time. The force of your connexion helps churn the data faster. If your network times out while y'all're still uploading, well, yous could end up with a blurry paradigm. Yous need to brand certain that yous have a potent internet connection when uploading to Instagram.
The all-time solution for this is to check your network status. Y'all may have to reboot your equipment, similar your modem and router, and simply try over again, like so:
- Locate your modem and router (if you have a router). In the dorsum, discover the power cable for both your modem and router. Follow the cords until you reach the power outlet they are both plugged into.
- Pull the power cords from the ability outlet and give the modem and router at least 2 minutes.
- Later 2 minutes has passed, plug your modem and router dorsum in. Give your modem and router time to reboot and beginning broadcasting your network. Double-bank check it's working by using another device similar a mobile device or a computer.
4. Your Image isn't Supported
Instagram doesn't back up a lot of different formats. Every bit of the writing of this article, Instagram only supports JPEG, GIF, and PNG file formats. If you anything but, so switch over to a different file format. If a file is not supported, then Instagram won't exist able to optimize the prototype which might go out you lot with a blurry moving picture. Sticking to their supported formats will maximize the chances of your epitome not being compressed.
5. Reducing Pinch in JPEG Files
Since Instagram will always have to practise some sort of compression on your image, you'll take to alive with the fact that at that place'due south nothing you tin do about that. Withal, there are ways to reduce the amount of compression they do so you don't have to experience the full effects of the quality loss.
When information technology comes to minimizing the amount of compression that's occurring, 1 key thing to take into consideration is the dimension of the photograph. The dimension is crucial to how your moving-picture show comes out when you upload it to Instagram. If you're able to do this, make sure the photo you want to upload is 2048px on its longest side. This volition minimize the corporeality of compression that'll take place. This is because Instagram won't change the dimensions of your paradigm therefore it remains as abrupt as possible.
If you haven't got a file that'southward this large, then make sure that the photograph is at least 960px on the longest side. If you're using editing software, brand sure that the picture is precipitous enough when looking at it with 100% view. Doing this volition ensure that it stays precipitous before you upload information technology. If things aren't looking too abrupt, then you can sharpen it upwards using Adobe Photoshop. Another great feature to utilise before you upload something to Instagram is the Salve for Web function. Compress the image to a JPEG file at 70% quality, whilst ensuring it'south at an sRGB colour profile.
Here are 6 ways to foreclose low quality uploads you'll be uploading via Instagram, which will notwithstanding stay in the limitation of 1080px but have better quality output. This means that after posting, you'll run into less loss of quality than if y'all didn't do the step below.
How to Fix Blurry Instagram Photos
i. Upload HD
There's an upload Hard disk drive settings that allows you to make sure that your pictures and videos are uploaded as Hard disk drive. If these aren't turned on, and so it could explain why your Instagram posts are blurry.
For Android:
1. Tap on the Hamburger push button.
two. Select Settings and Privacy
3. Go to the Settings tab.
4. Tap on the Media and Contacts selection.
5. Toggle Upload photos in Hd on.
For iOS:
ane. Tap on the Hamburger push.
ii. Select Settings and Privacy
3. Go to the Settings tab.
4. Tap on the Media and Contacts option.
five. Select Video and Pictures.
6. Toggle Upload photos in Hd on.
ii. Keeping the Right Aspect Ratio and so Instagram Doesn't Blur Your Photo
You demand to keep an aspect ratio of iv:5 and so that Instagram doesn't lower the quality of your photo. This will brand the ideal photo size 1080px by 1350px. This means that your photograph will fill up the screen so it will proceed the quality of the motion picture high. If you want to post a foursquare picture, then you demand to keep an aspect ratio of i:1. This means that the photograph size will be 1080px past 1080px.
To practice this with whatsoever photo you lot take, information technology's best you utilise Adobe Lightroom because this already has a setting that will continue your picture at an aspect ratio of 4:five. If you want an aspect ratio of 1:1, then simply using your phone's setting to crop will allow you to practise this.
- Go to Adobe Lightroom on desktop.
2. When choosing the attribute ratio, keep it at 4:5 or eight:ten.
3. When exporting the photo, check Resize to Fit.
4. 1080px with a resolution of 72ppi.
5. Select Sharpen for Screen.
6. Select Export.
3. Maximize Your Phones Camera Settings to Improve Loss of Quality
The best way to prevent a huge loss of quality in your Instagram photos is to maximize your phone'south camera quality. Doing this means that you'll accept ameliorate quality photos then when you lot upload them to Instagram and they do lose their quality, the divergence wouldn't be every bit bad if y'all didn't make the quality better initially.
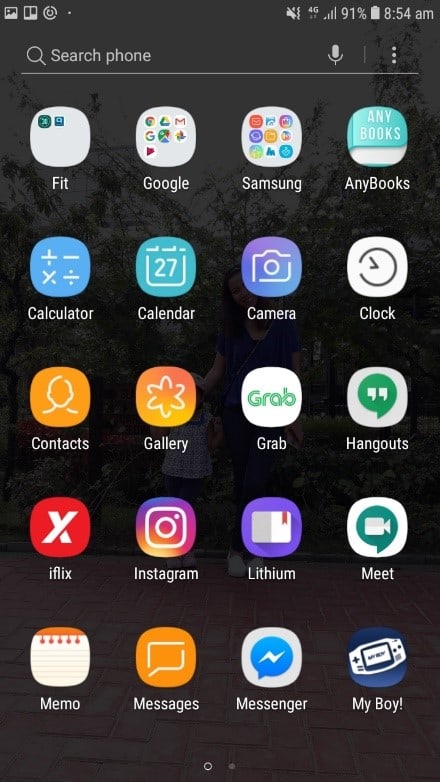
- Open up the default Camera app.

- Tap on the Gear icon. This will pull upward the settings menu of the Camera app. You'll immediately see the motion picture size on the acme portion of the settings.
- Click on Picture size.
- Ready it to the biggest size resolution. You can also tap on the video size and make sure it's at the maximum resolution size. For the example beneath, its FHD 1920 x 1080. If yous're using the front photographic camera for selfies and videos, make sure to arrange the settings for that too.
When you adjust the settings and max it out, Instagram will reduce the size of an image to fit its maximum rules. The maximum size of Instagram posts are 1080px and then if you take images from the default photographic camera, utilizing the best resolution will permit yous keep inside the maximum size of posts.
4. Employ sRGB Color Profiles
The problem with Instagram is that our photographic camera can capture more color than information technology could display. This means that the quality won't ever be as expert, only because the internet is unable to exercise so. The downside of this is that there'due south admittedly nothing y'all can do virtually the amount of color your screen is able to do. The chief reasons why screens are unable to testify as many colors as our cameras capture is due to poor color profiles, brightness, and gamma levels.
Another huge trouble is that about of the apps and software that people use when on the cyberspace are not color-managed. Browsers are a huge culprit and much of them fail to manage color. If you want to see an example of this, drag your jpeg image into Firefox browser window and see how much better it looks there compared to a browser similar Chrome. This is considering Firefox is color managed browser whereas most other browsers aren't. If yous want to make sure that apps like Instagram display your images equally best as possible, y'all need to export your paradigm from lightroom or photoshop and brand sure the color contour has been converted to the internet standard sRGB. This volition brand sure that
sRBG allows you to cater to those who are using their phone and information technology also allows wide displays like your laptop and PC to display the epitome properly because it knows it'south in sRBG – if this isn't the case, and so the picture won't brandish properly and it'll be over-saturated.
Phones like your iPhone and Android don't recognize embedded ICC profiles then images using colour spaces that aren't favored tend to appear slightly under-saturated on these devices. To ready this trouble, converting to sRGB when exporting ways that they will interpret and display the image correctly fifty-fifty enough they don't recognize sRGB.
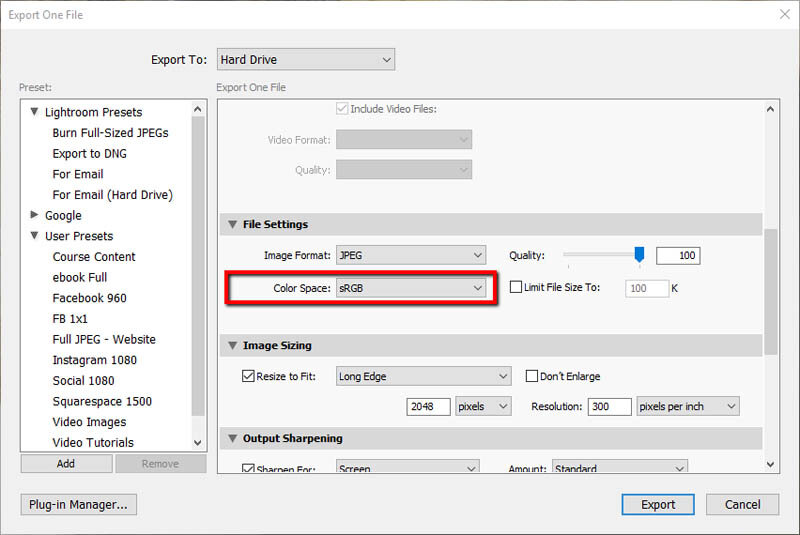
Sometimes you might notice that Instagram flattens the color and contract when y'all convert to sRGB just using tools like Lightroom and Adobe to boost the saturation and contrast will improve the upshot of your FB posts.
v. Don't Utilise Your WIFI
If your Instagram photos are low quality, then brand sure to utilise data instead of WIFI. To modify to WIFI, simply turn off your WIFI and turn your mobile data on.
- Change to data and plow off WIFI
- Postal service it on Instagram
- Check the quality of your Instagram post.
Unremarkably, mobile data has a more stable Internet connection which ways that you're more likely to accept a higher quality movie.
6. Use a High Quality to Keep Quality High and Prevent Blur
Another thing you tin do to keep the quality of your pictures high is to utilize a loftier-quality camera. This could either be a DSL camera that y'all're using and this will allow you to continue the quality high straight away.
Another neat alternative is a new iPhone or Android. These devices accept very avant-garde cameras and this will permit you to proceed your flick quality loftier. When you do upload the picture, rather than Instagram making it blurry, the movie will lose quality but it will still be of peachy quality compared to other people's posts that don't use high-quality cameras.
7. Use Instagram's Camera to Prevent Loss of Quality
If you're using another Camera app, maybe you tin consider using Instagram'south default photographic camera app. Although there isn't much you lot can practise with the default photographic camera of Instagram, information technology takes pretty decent photos that are loftier-res.
This follows the previous method's technique in taking a high-resolution photo and the post will simply be adjusted upon upload to the platform. Your photos aren't going to be any less pixelated but you'll see how they're going to turn on every bit shortly equally you have the photo every bit opposed to when you upload them and feel the huge drop in quality.
8. Don't Share the Photo Earlier Uploading to Preclude Initial Blurring
If yous're exchanging photos through Facebook Messenger or WhatsApp, there'southward a hundred percent hazard that the media content gets compressed. Messenger and WhatsApp do this in guild to keep the experience smooth and sacrifices some of the content quality of the photos and videos.
I know I'm guilty of this because I ever transport photos through WhatsApp so I didn't realize that the media gets compressed until I dug into the file directory. Sharing on apps earlier y'all mail service on Instagram will crusade initial compression so when yous exercise go to Instagram and mail the already compressed photograph, and so it could come out pixelated due to Instagram'southward further compression.
Alternatives to this can be sharing the file through Bluetooth, or uploading information technology via Google Drive or iCloud.
9. Update your Instagram App If Your Photos Are Blurring More than Than Usual
One way yous may be experiencing some poor image quality is if the app version you're using is outdated. Consider going to Google Play or iTunes App Store and download the latest version of Instagram. The app updates from time to time so y'all tin can bank check back to the app page of Instagram for the latest version.
You can too consider updating your device if y'all're using an older unit of measurement. Older units have an older version of Android or iOS which may non have the capabilities needed to run a more recent version of the Instagram app.
10. Use Other Photo editing Apps With Pre-Sets to Proceed Quality High
There are many other third-party apps and programs that you can use for your perfect Instagram mail service. If y'all've seen the vivid and beautiful images by many of today'southward Instagram influencers, then yous tin can bet a few of them would have used a third party app or program.
If yous're on your phone or a desktop, you can utilize Canva. They already considered Instagram's pre-set structures and framework so their templates are very good in quality.
I utilise this whenever I need a quick edit considering the templates are ready to get. Canva actually compliments Instagram and other apps that allow you to mail images and content. Canva has a mobile app that lets you practice the editing on your phone so you don't need to change screens or access your laptop or desktop.
xi. Set up Instagram Settings to Stop Further Loss of Quality
The first method to fix the photo quality on Instagram is through the app's settings.
- Get to your Instagram profile. To do this, yous tin tap on the lower correct icon or your profile flick. This will show you lot the profile tab.
- Tap on the carte. This is in the upper right icon with the three horizontal lines.
- Click Settings.
- Click Account.
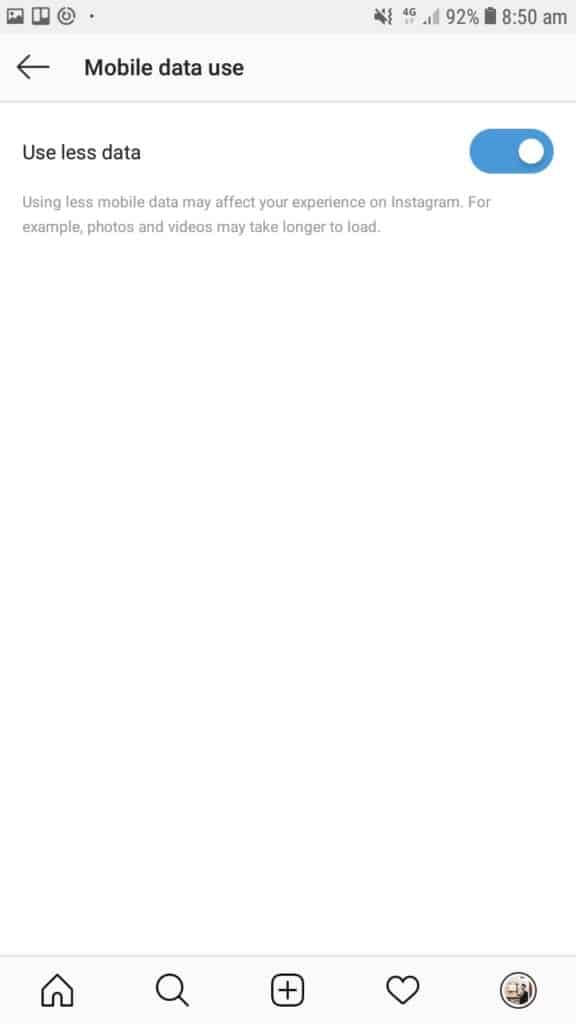
- Click on Mobile Information Employ below. Y'all'll encounter that Instagram tin assist save data then this may likewise impact the quality of the feel.
- Toggle off Employ Less Data.
12. Add Extra Brightness & A Little Saturation
Since Instagram has a white background, this can affect the brightness of the image and it can make it expect darker against the white background. Adding a little bit of saturation and brightness to your image earlier you upload it will set up this problem. If you've noticed most photography sites, the background is ever blackness because information technology helps the paradigm appear brighter and perfectly saturated.
thirteen. PNG Conversion
A while back, you lot could upload PNGs to Instagram without any problems, they wouldn't be compressed because of their lossless format, but now Instagram has started to convert PNGs to JPEGs on upload to forbid the upload or accept upward of retentivity which means that you'll experience compression.
One trick that many accept found to work is the procedure of exporting as a PNG since there'southward only one stage of compression that occurs with Instagram when compressing. It'southward merely one pace because if yous consign the images to your device equally a JPEG format, that's already when pace from RAW to JPB, then Instagram will shrink it once again. Although the divergence is pretty much undetectable as tests compressing JPG to JPG then PNG to JPG is almost undetectable only it's worth the attempt. If anything it'll exist a downside because it'll take up space on your device.
xiv. Uninstall and Re-install Instagram
If in that location's an error within Instagram that's causing Instagram photos to blur, you'll need to download it and reinstall it. There may be something wrong with Instagram itself and then redownloading it over again may clear upwardly the consequence.
If you lot want to uninstall Instagram:
- Agree Instagram and wait for the settings to show up.
- Tap on Delete and then tap delete again to confirm.
- Go dorsum to the Play Store or App Shop and download Instagram again
When y'all download it once again, go dorsum to the app and see if your photos are blurry.
15. Crop Ratios
Trying to decide the correct size for posting on platforms like Instagram is hard because the sizing is ever changing but a major tendency recently has shown that things are gearing towards mobile devices therefore verticle pictures are the manner forrard. Before verticle images were shrunk into tiny pics but at present the Instagram app is used a lot more than the desktop version, verticle is defo the best way to be sizing your pictures.
Other sites do prompt verticle images and it's the most common way images are viewed on mobile considering of the fashion they're desired. More real estate is allowed for verticle images which is why sites like Instagram have given the option to upload pictures that aren't any longer square.
Bottom Line
Instagram serves as a high appointment platform that allows businesses to achieve out to an audience and form 18-carat connections.
The developers of Instagram had prepare the platform with limitations so that people volition non be uploading content that are heavy in size and mode likewise big for whatever display device.
When I encountered the resolution and quality trouble, I realized that I was taking photos with a small resolution so it concluded up looking blurry. Consider trying the options that I've laid out above and let me know how it works out for you.
If you institute this article useful, exit a comment below, and subscribe to our newsletter.
Source: https://techzillo.com/fix-instagram-photo-video-quality/
0 Response to "Why Do My Pictures Upload Blurry on Instagram"
Postar um comentário